JeffB418
HYDROS Expert
Here are a couple ways you can use HYDROS to monitor and control your RODI setups. RODI setups are not limited to these configurations, but this gives you a good idea of the main use cases.
The first is a basic RODI system using a Control 2, 2 Drive Port Solenoids, and 2 Liquid Level Sensors:

Using the built in Hydros RODI profile, you can use a Control 2 to 1) automatically refill your RODI tank when low (stops when it hits the high sensor) and 2) automatically flush your RODI and save on DI resin
You can take this a step further and add on a booster pump:

This is the same as above, but you add a 120V powered booster pump to the front input and use a Hydros WIFI strip or Outlet to control it. The RODI profile also allows you to assign a booster pump and it will automatically control it for you.
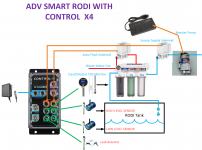
The next level you can take automated RODI is to add in TDS and leak monitoring:

This is similar to the previous setup but the X2 is swapped out for an X4. This now gives you 2 more sense ports that allows you to add a TDS monitor (2 TDS probes) and a leak sensor. The RODI profile lets you add a leak sensor and will automatically turn off the RODI if it senses a leak. The TDS input on Hydros also allows you to get notifications if your TDS is above a set limit.
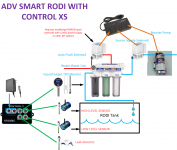
If you didnt want to go all the way and get X4, there are other ways to get the same functionality as the above setup with a little DIY:

In this case the X4 is swapped out with a XS, you still have the 4 sense ports needed for the same sensors/monitors but you do not have 2 drive ports for the solenoids anymore. In this case there are a couple of options to adapt 12V solenoids to 120V outlets:
1) DIY option: modify Hydros liquid solenoids and power them off a standard 12V 1A AC/DC power supply, just cut and connect. Maybe someday Coralvue will offer a solenoid with the power supply already adapted, but not currently. ($25 per solenoid + power supply from amazon ($8-15 each))
2) Use neptune systems solenoids + power supplies. This is a plug and play solution, buy 2 SV1 neptune solenoids (Apex FMM Solenoid Valve (SV-1) - Neptune Systems) and 2 DC24V power supplies (Accessory Power Supply for DC24V Devices GRO, PMUP, SV1 (PS-DC24) - Neptune Systems). This will allow you to control the 2 solenoids off 120V wifi strip and no cutting/soldering needed. Just plug and play. But this option does cost more ($50 per solenoid/power supply pair)
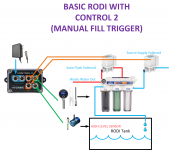
Another option that is alittle less automated for those who want TDS monitoring but don't want to go with a X4 or XS:

In this setup one of two liquid level sensors are removed and replaced with a TDS monitor. This setup will not automatically refill on its own, and requires the user to kick off the process anytime they want to make RODI. But this will automatically shut off the RODI when full, plus auto flush as well. In addition you can add a booster pump like before using a wifi power strip or outlet. Setup the RODI profile in Hydros as you normally would but leave the LOW sensor input to UNUSED. Then anytime you want to make RODI you will have to manually click the RODI outlet from AUTO to ON to enable the process, then move it back from ON to AUTO to allow it to automatically turn it off when done.
If you are wondering if you could just have a low level sensor then have RODI turn off after a set period of time, that's currently not possible. The RODI profile requires a high level sensor to operate. But its possible to do something similar using generic/combiner outputs and programming up your own logic (advanced but possible).
Note that there are details missing above on how to add the solenoid to your RODI for flushing, and other generic RODI setup details. Here are some other resources to help you out with those questions:
HYDROS RODI Profile Instructions HYDROS Control - How To Add an RODI Filter
CVTV Workshop on Hydros RODI systems CVTV Workshop
Icecap RODI Setup Guide: IceCap RO/DI Installation Instructions | coralvue.com
The first is a basic RODI system using a Control 2, 2 Drive Port Solenoids, and 2 Liquid Level Sensors:

Using the built in Hydros RODI profile, you can use a Control 2 to 1) automatically refill your RODI tank when low (stops when it hits the high sensor) and 2) automatically flush your RODI and save on DI resin
You can take this a step further and add on a booster pump:

This is the same as above, but you add a 120V powered booster pump to the front input and use a Hydros WIFI strip or Outlet to control it. The RODI profile also allows you to assign a booster pump and it will automatically control it for you.
The next level you can take automated RODI is to add in TDS and leak monitoring:

This is similar to the previous setup but the X2 is swapped out for an X4. This now gives you 2 more sense ports that allows you to add a TDS monitor (2 TDS probes) and a leak sensor. The RODI profile lets you add a leak sensor and will automatically turn off the RODI if it senses a leak. The TDS input on Hydros also allows you to get notifications if your TDS is above a set limit.
If you didnt want to go all the way and get X4, there are other ways to get the same functionality as the above setup with a little DIY:

In this case the X4 is swapped out with a XS, you still have the 4 sense ports needed for the same sensors/monitors but you do not have 2 drive ports for the solenoids anymore. In this case there are a couple of options to adapt 12V solenoids to 120V outlets:
1) DIY option: modify Hydros liquid solenoids and power them off a standard 12V 1A AC/DC power supply, just cut and connect. Maybe someday Coralvue will offer a solenoid with the power supply already adapted, but not currently. ($25 per solenoid + power supply from amazon ($8-15 each))
2) Use neptune systems solenoids + power supplies. This is a plug and play solution, buy 2 SV1 neptune solenoids (Apex FMM Solenoid Valve (SV-1) - Neptune Systems) and 2 DC24V power supplies (Accessory Power Supply for DC24V Devices GRO, PMUP, SV1 (PS-DC24) - Neptune Systems). This will allow you to control the 2 solenoids off 120V wifi strip and no cutting/soldering needed. Just plug and play. But this option does cost more ($50 per solenoid/power supply pair)
Another option that is alittle less automated for those who want TDS monitoring but don't want to go with a X4 or XS:

In this setup one of two liquid level sensors are removed and replaced with a TDS monitor. This setup will not automatically refill on its own, and requires the user to kick off the process anytime they want to make RODI. But this will automatically shut off the RODI when full, plus auto flush as well. In addition you can add a booster pump like before using a wifi power strip or outlet. Setup the RODI profile in Hydros as you normally would but leave the LOW sensor input to UNUSED. Then anytime you want to make RODI you will have to manually click the RODI outlet from AUTO to ON to enable the process, then move it back from ON to AUTO to allow it to automatically turn it off when done.
If you are wondering if you could just have a low level sensor then have RODI turn off after a set period of time, that's currently not possible. The RODI profile requires a high level sensor to operate. But its possible to do something similar using generic/combiner outputs and programming up your own logic (advanced but possible).
Note that there are details missing above on how to add the solenoid to your RODI for flushing, and other generic RODI setup details. Here are some other resources to help you out with those questions:
HYDROS RODI Profile Instructions HYDROS Control - How To Add an RODI Filter
CVTV Workshop on Hydros RODI systems CVTV Workshop
Icecap RODI Setup Guide: IceCap RO/DI Installation Instructions | coralvue.com
Last edited:
