Auto water change

Users Who Are Viewing This Thread (Total: 1, Members: 0, Guests: 1)

Scharapenko

New member
Joined
Nov 15, 2020
Messages
8
Reaction score
3
Location
barrie, ontario
I imagine an auto water change system could be done fairly simple. 2 pumps running on the drive ports or wifi strips and 2 optical sensors on the sense ports. Having the control shut off the auto while running AWC. Has anyone set this up yet using there control4 ? What would be other setting to enter? Maximum on time? Possible alerts?

Thanks
 
You could do it that way but becareful that the ATO does not run.

Rumor has it there is an auto water change coming.
 
I use dosing pumps and run both at the same time. No need to turn anything off while doing it this way, Water s removed from the refugium section and water s added to the return pump section of the sump. I do have a low level sensor and overfull level sensor that if tripped will shut off the AWC pumps.
 
I am working on a way to do AWC with the currently available output profiles. I hope to test it this weekend. I will keep you updated.
 
I plan on moving the pumps over to the Hydros this weekend. I figured out a way to do the three times a day change out until they fix the repeat on the timers. It has work correctly the last couple of days. I monitor the output via a switch input on my Archon to test it out before switching out the pumps.
 
Yeah this is my plan here. Note this is untested as of now.

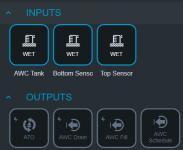
First I have 3 sense inputs. 2 sensors in my sump: one at the normal level (used for ATO normally) and a lower sensor for where I want to drain down to during a AWC. Then the 3rd sensor resides in my premixed AWC water tank. This sensor is at the minimum level in the tank that will allow 1 AWC session to finish without running dry. This is my safety not to start a AWC if I am out of AWC premix. This is an optional input.
1608217574727.png
Then I have 5 outputs:
- Standard ATO output for my ATO pump using the ATO profile.
- AWC Drain pump output. This is for a pump in my sump that pumps to a drain.
- AWC Fill pump output. This is for a pump in my AWC premix tank to pump back into my sump.
- AWC Schedule. This is a false or "virtual" output. This output runs the master schedule for the AWC.
- AWC Combiner. This is a false/virtual output that allows us to combine the states of AWC Schedule and AWC Drain for use in the fill output.

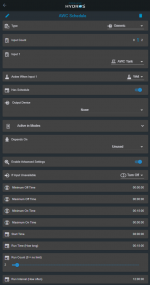
The first output you should setup is the AWC schedule false/virtual output:
1608217973978.png
This schedules when you want the AWC to run. Here are some important parameters:
- Input 1: AWC Tank (sensor) - This input will only allow this schedule to run if there is enough premixed saltwater left in my mix tank. The following "Active When Input 1" should be set to WET. If this sensor is DRY at the START of a AWC cycle, then AWC schedule will not be kicked off.
- Active in modes: Set this to be active ONLY in your NORMAL mode. You do not want AWC happening during feed modes, water change modes, or any other mode normally.
- Min On Time: You must set this if you are using a sensor in your AWC premix tank. Set this to just longer than a full AWC cycle should take (time to drain, and refill). For this example I am assuming it will take 15 mins to complete. You need to set this if you use a sensor in your premix tank since you do not want an AWC cycle to stop in the middle of a exchange if your sensor goes dry. This will ensure a full cycle will still occur. You should place your premix sensor high enough that a full AWC cycle's worth of water is available in your premix tank.
- Run time: Set this to slightly longer than it would take to do a full AWC cycle. This should be set to the same as Min On Time
- Start Time: What time do you want your first AWC cycle to start. For my example I have the first one kicking off at 10AM
- Run Count: How many times in a day do you want to run an AWC cycle. For this example I want it to run 2x a day.
- Run Interval: How long between AWC cycles. For my example I will run an AWC cycle for 15 minutes at 10AM and 10PM. Note that the current released version of firmware will not allow this. This will be fixed shortly. For now you can set run count to 1 and do 1 AWC a day.

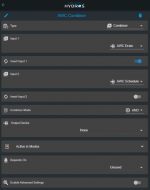
Next we need to setup a combiner outlet to act as a bridge between draining and filling. Doing this using a combiner since you can't refer to more than 1 output inside a generic profile.
1608220457895.png
This will just combine the status of the drain output and the AWC schedule. Note to use AND for this function and invert input 1. This will give us the following logic: this output will ONLY be ON/Active when both AWC Schedule is ON and AWC Drain is OFF. This will allow us to force the AWC Refill output to OFF if either 1) AWC schedule is not active or 2) AWC schedule is active and AWC Drain is ON.

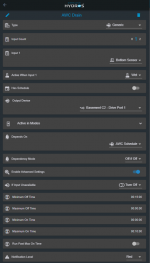
Next we will setup the drain pump:
1608218699675.png
Here is where we configure when the drain pump should run. Here are some important parameters:
- Input 1: This is your bottom sensor (optical or float switch) that will trigger this mode to run/stop. Set this input to Active when WET. This will run the pump UNTIL the sensor is dry. Meaning you drained everything for an AWC cycle.
- Active in Modes: Again like AWC, this should be set to NORMAL only.
- Depends on: Link this output to your master AWC schedule by selecting the output for your AWC schedule.
- Dependency Mode: This controls when you will drain. Set this to OFF IF OFF. Meaning, if your AWC schedule isn't running, you should NEVER drain. If AWC schedule is active, AND your bottom sensor is WET, then drain away!
- Minimum off time: This one is important. Set this to the same value as your AWC cycle duration you set in the AWC schedule. You will want to make sure this output stays OFF after it has run ONCE during an AWC cycle. So here I set it to 15 minutes, meaning this outlet can't turn on again during the active 15 min AWC cycle.
- Maximum on time: Set this to slightly longer than it should normally take to drain your tank/sump to make the bottom sensor dry. This will work as an alarm incase something is up and goes wrong during an AWC cycle. For example if your drain pump has died, this will alert you that its taking way longer than it should to drain to the bottom sensor. Or maybe the sensor is bad.

Finally we setup the refill pump output.
1608221420805.png
This is another generic output. Here are important items to configure:
- Input 1: Set this to your ATO/Full Sensor
- Active when input 1: Set this to dry, you will want to refill if the sensor is dry
- Depends on: This is important, you need to select the AWC combiner you made previously. This is needed since you can't reference 2 outputs directly inside a generic profile.
- Dependency Mode: Set this to Off if Off. This is what forces you to ONLY refill if the following conditions are met: 1) top sensor is dry, 2) AWC Schedule is running, and 3) AWC Drain is not running. This will also help with a certain race condition where AWC schedule is enabled but the top sensor is dry for some reason (ato hasn't filled all the way yet?). The race condition occurs when both AWC Drain and AWC Fill kicks off at the same time. This conditional will force the AWC fill to automatically shut off once the AWC drain cycle starts. Otherwise you could have them running at the same time, and if the pumps were the same, you'd never finish the cycle.
Min off time: This one you want to set to something like 30 seconds. This is important due to the above statement above the race condition. Its possible that AWC Fill could kick off for a couple of seconds in the beginning of a AWC cycle, so you will want to make this short enough that it will clear before it comes back to the refill part of the cycle. But you do not want to set this to 0 since it could cause the pump to cycle quickly when it refills it to the sensor. Waves in your sump could cause the top sensor to trigger wet/dry rapidly and you do not want to cycle the pump that quickly. You may also want to set min on time to something like 15 seconds to help with this as well. Just like you would with an ATO pump.

Finally we need to make sure our ATO doesn't run during our AWC schedule:
1608221637768.png
This is pretty simple, just use the Depends On drop box to select your AWC Schedule output. Then make the dependency turn off your ATO output if the AWC Schedule is enabled.

So this is my plan for AWC. I haven't tested it yet but my thought process seems to cover most/all cases. If you want to try this with the latest firmware release, just drop the schedule to 1 cycle per day, that should work. Coralvue is working on a simple profile that does all this for us, but this shows you that it should be possible with the tools we have today.
 
Yeah this is my plan here. Note this is untested as of now.

First I have 3 sense inputs. 2 sensors in my sump: one at the normal level (used for ATO normally) and a lower sensor for where I want to drain down to during a AWC. Then the 3rd sensor resides in my premixed AWC water tank. This sensor is at the minimum level in the tank that will allow 1 AWC session to finish without running dry. This is my safety not to start a AWC if I am out of AWC premix. This is an optional input.
View attachment 456
Then I have 5 outputs:
- Standard ATO output for my ATO pump using the ATO profile.
- AWC Drain pump output. This is for a pump in my sump that pumps to a drain.
- AWC Fill pump output. This is for a pump in my AWC premix tank to pump back into my sump.
- AWC Schedule. This is a false or "virtual" output. This output runs the master schedule for the AWC.
- AWC Combiner. This is a false/virtual output that allows us to combine the states of AWC Schedule and AWC Drain for use in the fill output.

The first output you should setup is the AWC schedule false/virtual output:
View attachment 457
This schedules when you want the AWC to run. Here are some important parameters:
- Input 1: AWC Tank (sensor) - This input will only allow this schedule to run if there is enough premixed saltwater left in my mix tank. The following "Active When Input 1" should be set to WET. If this sensor is DRY at the START of a AWC cycle, then AWC schedule will not be kicked off.
- Active in modes: Set this to be active ONLY in your NORMAL mode. You do not want AWC happening during feed modes, water change modes, or any other mode normally.
- Min On Time: You must set this if you are using a sensor in your AWC premix tank. Set this to just longer than a full AWC cycle should take (time to drain, and refill). For this example I am assuming it will take 15 mins to complete. You need to set this if you use a sensor in your premix tank since you do not want an AWC cycle to stop in the middle of a exchange if your sensor goes dry. This will ensure a full cycle will still occur. You should place your premix sensor high enough that a full AWC cycle's worth of water is available in your premix tank.
- Run time: Set this to slightly longer than it would take to do a full AWC cycle. This should be set to the same as Min On Time
- Start Time: What time do you want your first AWC cycle to start. For my example I have the first one kicking off at 10AM
- Run Count: How many times in a day do you want to run an AWC cycle. For this example I want it to run 2x a day.
- Run Interval: How long between AWC cycles. For my example I will run an AWC cycle for 15 minutes at 10AM and 10PM. Note that the current released version of firmware will not allow this. This will be fixed shortly. For now you can set run count to 1 and do 1 AWC a day.

Next we need to setup a combiner outlet to act as a bridge between draining and filling. Doing this using a combiner since you can't refer to more than 1 output inside a generic profile.
View attachment 460
This will just combine the status of the drain output and the AWC schedule. Note to use AND for this function and invert input 1. This will give us the following logic: this output will ONLY be ON/Active when both AWC Schedule is ON and AWC Drain is OFF. This will allow us to force the AWC Refill output to OFF if either 1) AWC schedule is not active or 2) AWC schedule is active and AWC Drain is ON.

Next we will setup the drain pump:
View attachment 458
Here is where we configure when the drain pump should run. Here are some important parameters:
- Input 1: This is your bottom sensor (optical or float switch) that will trigger this mode to run/stop. Set this input to Active when WET. This will run the pump UNTIL the sensor is dry. Meaning you drained everything for an AWC cycle.
- Active in Modes: Again like AWC, this should be set to NORMAL only.
- Depends on: Link this output to your master AWC schedule by selecting the output for your AWC schedule.
- Dependency Mode: This controls when you will drain. Set this to OFF IF OFF. Meaning, if your AWC schedule isn't running, you should NEVER drain. If AWC schedule is active, AND your bottom sensor is WET, then drain away!
- Minimum off time: This one is important. Set this to the same value as your AWC cycle duration you set in the AWC schedule. You will want to make sure this output stays OFF after it has run ONCE during an AWC cycle. So here I set it to 15 minutes, meaning this outlet can't turn on again during the active 15 min AWC cycle.
- Maximum on time: Set this to slightly longer than it should normally take to drain your tank/sump to make the bottom sensor dry. This will work as an alarm incase something is up and goes wrong during an AWC cycle. For example if your drain pump has died, this will alert you that its taking way longer than it should to drain to the bottom sensor. Or maybe the sensor is bad.

Finally we setup the refill pump output.
View attachment 463
This is another generic output. Here are important items to configure:
- Input 1: Set this to your ATO/Full Sensor
- Active when input 1: Set this to dry, you will want to refill if the sensor is dry
- Depends on: This is important, you need to select the AWC combiner you made previously. This is needed since you can't reference 2 outputs directly inside a generic profile.
- Dependency Mode: Set this to Off if Off. This is what forces you to ONLY refill if the following conditions are met: 1) top sensor is dry, 2) AWC Schedule is running, and 3) AWC Drain is not running. This will also help with a certain race condition where AWC schedule is enabled but the top sensor is dry for some reason (ato hasn't filled all the way yet?). The race condition occurs when both AWC Drain and AWC Fill kicks off at the same time. This conditional will force the AWC fill to automatically shut off once the AWC drain cycle starts. Otherwise you could have them running at the same time, and if the pumps were the same, you'd never finish the cycle.
Min off time: This one you want to set to something like 30 seconds. This is important due to the above statement above the race condition. Its possible that AWC Fill could kick off for a couple of seconds in the beginning of a AWC cycle, so you will want to make this short enough that it will clear before it comes back to the refill part of the cycle. But you do not want to set this to 0 since it could cause the pump to cycle quickly when it refills it to the sensor. Waves in your sump could cause the top sensor to trigger wet/dry rapidly and you do not want to cycle the pump that quickly. You may also want to set min on time to something like 15 seconds to help with this as well. Just like you would with an ATO pump.

Finally we need to make sure our ATO doesn't run during our AWC schedule:
View attachment 464
This is pretty simple, just use the Depends On drop box to select your AWC Schedule output. Then make the dependency turn off your ATO output if the AWC Schedule is enabled.

So this is my plan for AWC. I haven't tested it yet but my thought process seems to cover most/all cases. If you want to try this with the latest firmware release, just drop the schedule to 1 cycle per day, that should work. Coralvue is working on a simple profile that does all this for us, but this shows you that it should be possible with the tools we have today.
@Carlos does this scare you? :p
 
I love it, man!!! I promise we will have a much easier way to do this very soon. We are listening to folks and in the upcoming update, you will see a lot of the changes that you all have requested. This one will not be included with the upcoming version but I promise you, it will be in a future release!
 
Yeah this is my plan here. Note this is untested as of now.

First I have 3 sense inputs. 2 sensors in my sump: one at the normal level (used for ATO normally) and a lower sensor for where I want to drain down to during a AWC. Then the 3rd sensor resides in my premixed AWC water tank. This sensor is at the minimum level in the tank that will allow 1 AWC session to finish without running dry. This is my safety not to start a AWC if I am out of AWC premix. This is an optional input.
View attachment 456
Then I have 5 outputs:
- Standard ATO output for my ATO pump using the ATO profile.
- AWC Drain pump output. This is for a pump in my sump that pumps to a drain.
- AWC Fill pump output. This is for a pump in my AWC premix tank to pump back into my sump.
- AWC Schedule. This is a false or "virtual" output. This output runs the master schedule for the AWC.
- AWC Combiner. This is a false/virtual output that allows us to combine the states of AWC Schedule and AWC Drain for use in the fill output.

The first output you should setup is the AWC schedule false/virtual output:
View attachment 457
This schedules when you want the AWC to run. Here are some important parameters:
- Input 1: AWC Tank (sensor) - This input will only allow this schedule to run if there is enough premixed saltwater left in my mix tank. The following "Active When Input 1" should be set to WET. If this sensor is DRY at the START of a AWC cycle, then AWC schedule will not be kicked off.
- Active in modes: Set this to be active ONLY in your NORMAL mode. You do not want AWC happening during feed modes, water change modes, or any other mode normally.
- Min On Time: You must set this if you are using a sensor in your AWC premix tank. Set this to just longer than a full AWC cycle should take (time to drain, and refill). For this example I am assuming it will take 15 mins to complete. You need to set this if you use a sensor in your premix tank since you do not want an AWC cycle to stop in the middle of a exchange if your sensor goes dry. This will ensure a full cycle will still occur. You should place your premix sensor high enough that a full AWC cycle's worth of water is available in your premix tank.
- Run time: Set this to slightly longer than it would take to do a full AWC cycle. This should be set to the same as Min On Time
- Start Time: What time do you want your first AWC cycle to start. For my example I have the first one kicking off at 10AM
- Run Count: How many times in a day do you want to run an AWC cycle. For this example I want it to run 2x a day.
- Run Interval: How long between AWC cycles. For my example I will run an AWC cycle for 15 minutes at 10AM and 10PM. Note that the current released version of firmware will not allow this. This will be fixed shortly. For now you can set run count to 1 and do 1 AWC a day.

Next we need to setup a combiner outlet to act as a bridge between draining and filling. Doing this using a combiner since you can't refer to more than 1 output inside a generic profile.
View attachment 460
This will just combine the status of the drain output and the AWC schedule. Note to use AND for this function and invert input 1. This will give us the following logic: this output will ONLY be ON/Active when both AWC Schedule is ON and AWC Drain is OFF. This will allow us to force the AWC Refill output to OFF if either 1) AWC schedule is not active or 2) AWC schedule is active and AWC Drain is ON.

Next we will setup the drain pump:
View attachment 458
Here is where we configure when the drain pump should run. Here are some important parameters:
- Input 1: This is your bottom sensor (optical or float switch) that will trigger this mode to run/stop. Set this input to Active when WET. This will run the pump UNTIL the sensor is dry. Meaning you drained everything for an AWC cycle.
- Active in Modes: Again like AWC, this should be set to NORMAL only.
- Depends on: Link this output to your master AWC schedule by selecting the output for your AWC schedule.
- Dependency Mode: This controls when you will drain. Set this to OFF IF OFF. Meaning, if your AWC schedule isn't running, you should NEVER drain. If AWC schedule is active, AND your bottom sensor is WET, then drain away!
- Minimum off time: This one is important. Set this to the same value as your AWC cycle duration you set in the AWC schedule. You will want to make sure this output stays OFF after it has run ONCE during an AWC cycle. So here I set it to 15 minutes, meaning this outlet can't turn on again during the active 15 min AWC cycle.
- Maximum on time: Set this to slightly longer than it should normally take to drain your tank/sump to make the bottom sensor dry. This will work as an alarm incase something is up and goes wrong during an AWC cycle. For example if your drain pump has died, this will alert you that its taking way longer than it should to drain to the bottom sensor. Or maybe the sensor is bad.

Finally we setup the refill pump output.
View attachment 463
This is another generic output. Here are important items to configure:
- Input 1: Set this to your ATO/Full Sensor
- Active when input 1: Set this to dry, you will want to refill if the sensor is dry
- Depends on: This is important, you need to select the AWC combiner you made previously. This is needed since you can't reference 2 outputs directly inside a generic profile.
- Dependency Mode: Set this to Off if Off. This is what forces you to ONLY refill if the following conditions are met: 1) top sensor is dry, 2) AWC Schedule is running, and 3) AWC Drain is not running. This will also help with a certain race condition where AWC schedule is enabled but the top sensor is dry for some reason (ato hasn't filled all the way yet?). The race condition occurs when both AWC Drain and AWC Fill kicks off at the same time. This conditional will force the AWC fill to automatically shut off once the AWC drain cycle starts. Otherwise you could have them running at the same time, and if the pumps were the same, you'd never finish the cycle.
Min off time: This one you want to set to something like 30 seconds. This is important due to the above statement above the race condition. Its possible that AWC Fill could kick off for a couple of seconds in the beginning of a AWC cycle, so you will want to make this short enough that it will clear before it comes back to the refill part of the cycle. But you do not want to set this to 0 since it could cause the pump to cycle quickly when it refills it to the sensor. Waves in your sump could cause the top sensor to trigger wet/dry rapidly and you do not want to cycle the pump that quickly. You may also want to set min on time to something like 15 seconds to help with this as well. Just like you would with an ATO pump.

Finally we need to make sure our ATO doesn't run during our AWC schedule:
View attachment 464
This is pretty simple, just use the Depends On drop box to select your AWC Schedule output. Then make the dependency turn off your ATO output if the AWC Schedule is enabled.

So this is my plan for AWC. I haven't tested it yet but my thought process seems to cover most/all cases. If you want to try this with the latest firmware release, just drop the schedule to 1 cycle per day, that should work. Coralvue is working on a simple profile that does all this for us, but this shows you that it should be possible with the tools we have today.
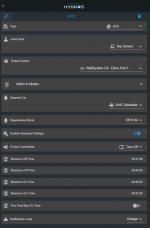
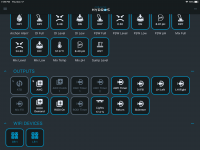
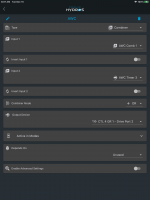
Jeff I was able to get mine to do it three times a day by using a virtual output for each time I want it to run. I called them AWC Timer 1, AWC Timer 2 and AWC Timer 3.

0EB7E0AA-6E6F-465F-BE73-9EE021A0B6A6.png

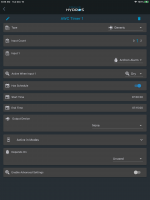
One of the AWC Timer 1 is listed below.

A3DFD0D5-044A-43E0-BCB5-FDD65B38A43E.png

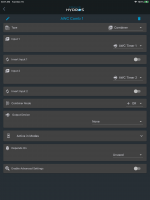
I combined Timer output 1 and 2 with the virtual output as below using combiner mode OR.


16A73FF0-BADB-40C7-A53D-F392799837F6.png

Below is the actual AWC output is also a combiner and combines the combiner output above with output timer 3. I use the same output to run both dosing pumps used for the AWC. The pumps are calibrated to match each outer with all tubing attached. I do not turn off any pumps while doing the water change. The water is added to the sump in the return pump section. Water is removed from the refugium section of the sump. I have been doing it this way for several years with a different controller. Right now the pumps are still on the other controller but I have been monitoring the AWC output and it has been mirroring the other controller so I plan to move the pumps over to the Control 4 this weekend.

DAC50BE5-8A18-4AC7-B509-F872067B18B2.png
 
Back
Top