Navigation
Install the app
How to install the app on iOS
Follow along with the video below to see how to install our site as a web app on your home screen.
Note: This feature may not be available in some browsers.
More options
You are using an out of date browser. It may not display this or other websites correctly.
You should upgrade or use an alternative browser.
You should upgrade or use an alternative browser.
Sicce SDC 7.0 Pump connection to Kraken Force Port 24v
Users Who Are Viewing This Thread (Total: 0, Members: 0, Guests: 0)
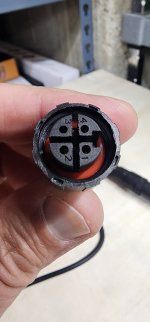
Hello, please see attached. The numbers on my connector don't align with the pinout diagram. Do I ignore the numbers on my connector & just go with the pinout diagram?
So on my connecter 3 & 4 are ground (black) and 1 & 2 are hot (red). Please let me know your thoughts.
Ken
So on my connecter 3 & 4 are ground (black) and 1 & 2 are hot (red). Please let me know your thoughts.
Ken
Attachments
I haven't tested anything yet, but i think you and I are questioning the same thing. Did Sicce move the hot and ground pin out around. Looking at the sicce power supply it is a meanwell that was altered from stock.Hello, please see attached. The numbers on my connector don't align with the pinout diagram. Do I ignore the numbers on my connector & just go with the pinout diagram?
So on my connecter 3 & 4 are ground (black) and 1 & 2 are hot (red). Please let me know your thoughts.
Ken
BR260354
Member
well, it's been a while since I made the cables. Let me access one of mine and I'll take a look to verify. I'm also going to find my old post to see if I listed it there.Hello, please see attached. The numbers on my connector don't align with the pinout diagram. Do I ignore the numbers on my connector & just go with the pinout diagram?
So on my connecter 3 & 4 are ground (black) and 1 & 2 are hot (red). Please let me know your thoughts.
Ken
Thanks Richard! I have them wired & ready, but my buddy said something doesn't seem right once he saw that pinout diagram vs the numbers on the plug & to verify before plugging them in. BTW, no hurry! I've waited this long to get these powered up with Kraken. I'm in no hurry, I just want to make sure it's 100% correct! I don't want to fry anything! 
Thanks so much!
Ken
Thanks so much!
Ken
BR260354
Member
I just checked. From my barrel (from Amazon), I have a red and white wire. Red is going to 3/4 and white to 1/2. Hope this helps.
BR260354
Member
Also, Looks like on my ReefRun 5500, which I use to pump from the sump to the refugium, I did the "cut the wire from the brick" method. I guess I ran out of M16 connectors. ") . it works.
. it works.
. it works.Are the numbers on your plug at the same positions as mine? Because if they are, then the pinout diagram is wrong/backwards & I have mine wired backwards. I attached a video of my plug.
Now I'm really scared to plug this in!
Now I'm really scared to plug this in!

BR260354
Member
my M16 connector numbers / order is the same.
When I unplugged to check the connector, sparks flew when I connected it back. Guess I should have turned it off first. Oh well, everything still works.
The force port cable used to come with a gender bender which I believe also switches the ground and hots. I've had to use that on one of my cables....maybe it was the M12 connector for the ReefMat.
I just had an epiphany! Why don't I open up the Sicce connector & look at how it is wired!  I never claimed to be the sharpest knife in the drawer.
Thank God I never plugged in my cable!
Probably would have fried my pump!
So, can anyone help me decipher what the info below & the wire colors mean in the attached photo?
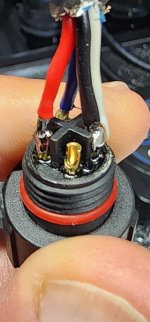
The wire to the M16 connector on my Sicce 7.0 pump has 4 wires connected to it (red, blue, black, white).
The Sicce SDC 7.0 is wired as such:
Red to pin 1
Blue to pin 2
Black & White to pin 3
Pin 4 is unused
The problem is my female 2.1mm barrel connector only has two wires (black & white). Is there a way for me to make this work? If I cannot make the connectors work, can I cut the wire to the brick off & spiluce/heat shrink them? Which wires to which wires I guess is what I'm asking.
Thanks,
Ken
I never claimed to be the sharpest knife in the drawer. Thank God I never plugged in my cable!
Probably would have fried my pump! So, can anyone help me decipher what the info below & the wire colors mean in the attached photo?
The wire to the M16 connector on my Sicce 7.0 pump has 4 wires connected to it (red, blue, black, white).
The Sicce SDC 7.0 is wired as such:
Red to pin 1
Blue to pin 2
Black & White to pin 3
Pin 4 is unused
The problem is my female 2.1mm barrel connector only has two wires (black & white). Is there a way for me to make this work? If I cannot make the connectors work, can I cut the wire to the brick off & spiluce/heat shrink them? Which wires to which wires I guess is what I'm asking.
Thanks,
Ken
Attachments
70rsss
New member
Hi Ken, I'm new (first post) and I am about to set up a new 120 tank. I have purchased a Kraken and a Sicce 7.0 pump. So I'm in the same boat, wanting to know how to wire the two together. Please let us know how you solved this problem.
Thanks,
Scott
Thanks,
Scott
I have! Just today! I plan to post a how-to with photos & links later today if I get time, or tomorrow.
I have two SDC 7.0's. And that has presented a whole new problem. When both pumps are on 100%, they draw too much power & Kraken shuts down one. It will run them at 75% or so, but if you are running both higher than that, Kraken will shut one down. Luckily, I run both at 60% & that keeps my sump right where I need it, but the PC Board Temp in the photo is higher than normal and orange (see photo). I need to do a post to see if this is a problem. If it is, I'll have no choice but to go back to a power brick or just go with Varios pumps.
If I was you, I'd just take the Sicce pump back & get a Varios from Reef Octopus. It is plug & play. No mod. I have one running my skimmer, it was super easy & fast.
That, or just take back Kraken. I love Hydros, but overall, for me, Kraken is a huge disappointment. EVERYTHING I have required some mod to make it work, except the Varios. Some were easy mods, this Sicce one was time consuming & difficult. Wish I had just saved the money on Kraken, and that would have save me a ton of headache & frustration.
Hydros says it will power any 24V device. And I guess that's true, I just don't recall reading anything about having to buy a bunch of extra stuff & having to waste time having to do mods to make almost everything work.
Attachments

Hotter now. It is very, very, very slowly, but steadily climbing. Assuming it will get to a point & shut itself down, hopefully anyway. I did not have this issue with 1 pump running, only when I hooked up the second. I will be going back to a brick for one it is looking like.
Attachments

Ok, here is the how-to guide to making a DIY cable so the Sicce SDC 7.0 pump can be powered with Kraken.
First, you'll need to buy these: Amazon.com
You'll only need the Female side. These are quality connectors with quality wire. Maybe you can find someone that sells only the Female? I couldn't find them, but I'm sure they are out there, I didn't spend a whole lot of time looking. The first ones I bought were advertised as 18AWG wire, but when I got them, they weren't. The wire was super tiny and thin and defintely not 18AWG, so be careful. From what I have read, the guage of the wire DOES matter.
Next, you'll need one of these for each DIY conector: https://www.aliexpress.us/item/3256...st_main.5.62991802F7ZB5I&gatewayAdapt=glo2usa
These screws are tiny. If you can solder and have the tools, you can get the solder type. I don't, so I went with the screws. I cannnot even see the screw tips they are so small, and if your screw them out too far, they can fall out, and trust me, they are so tiny, once one hits the floor, you will never find it
When you open the Sicce connector going into the controller, you will see:
Red wire connected to pin 1
Blue wire connected to pin 2
Black & White wires connected to pin 3
Nothing connected to pin 4
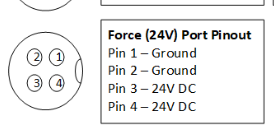
Below is the pinout for the Kraken.

Now it's time to make the connector.
Here is the wire before assembly. I used a heat shrink tube (probably not necessary). Put the tube on the wire, and then the TWO parts you see in the photo that screw onto the Sicce controller after you assemble everything. Here is a picture. And you'll need to make two small jumpers.

Next is a photo of the cable with the jumpers installed. You need to bend them to 180 degrees.

Here is a pic where you can see the RED wire is going to Pin 3 with a jumper to Pin 4.

Finally, here are two pics showing the completed cable. The black wire goes to Pin 1 with a jumper to Pin 2.


I want to give a shout out to Richard (BR260354) for the help he gave me with this. He is also the one who supplied the link to the M16 Connector from Ali Express. It's people like him that jump in here giving up their free time to out fellow reefers. And he is the reason I am making this post (just paying it forward in hopes that this post will help someonw else). And finally a shout out to my wife, who was basically my eyes and hands as these screws and jumpers are very, very small and difficult to make for an old guy I was able to make everything and get it all ready, she put those tiny wires into the screw-down sockets while I held everthing in place as she screwed down the screws. You can see the screwdrivers we used in some of the photos. These are from an eyeglass repair kit my wife had (came in very handy). We had to use the smallest philips screwdriver in the kit.
This DIY mod works for me. However, I take no responsibilty for anyone else attempting this mod if it were to damage their pump, Kraken, or anything else. I am currently running two Sicce SDC 7.0 pumps being powered by Kraken with this mod. Thses two pumps does make the Kraken PC Board Temp run slightly higher, turning the temp numbers Orange. Here is more info about that in this thread here at Hydros Forum: Kraken PC Board Temp Too High???
I am assured by Hydros that this is not a problem for the pumps or Kraken. Let me know if anyone has any questions, I am happy to try and help.
Ken S
First, you'll need to buy these: Amazon.com
You'll only need the Female side. These are quality connectors with quality wire. Maybe you can find someone that sells only the Female? I couldn't find them, but I'm sure they are out there, I didn't spend a whole lot of time looking. The first ones I bought were advertised as 18AWG wire, but when I got them, they weren't. The wire was super tiny and thin and defintely not 18AWG, so be careful. From what I have read, the guage of the wire DOES matter.
Next, you'll need one of these for each DIY conector: https://www.aliexpress.us/item/3256...st_main.5.62991802F7ZB5I&gatewayAdapt=glo2usa
These screws are tiny. If you can solder and have the tools, you can get the solder type. I don't, so I went with the screws. I cannnot even see the screw tips they are so small, and if your screw them out too far, they can fall out, and trust me, they are so tiny, once one hits the floor, you will never find it
When you open the Sicce connector going into the controller, you will see:
Red wire connected to pin 1
Blue wire connected to pin 2
Black & White wires connected to pin 3
Nothing connected to pin 4
Below is the pinout for the Kraken.
Now it's time to make the connector.
Here is the wire before assembly. I used a heat shrink tube (probably not necessary). Put the tube on the wire, and then the TWO parts you see in the photo that screw onto the Sicce controller after you assemble everything. Here is a picture. And you'll need to make two small jumpers.
Next is a photo of the cable with the jumpers installed. You need to bend them to 180 degrees.
Here is a pic where you can see the RED wire is going to Pin 3 with a jumper to Pin 4.
Finally, here are two pics showing the completed cable. The black wire goes to Pin 1 with a jumper to Pin 2.
I want to give a shout out to Richard (BR260354) for the help he gave me with this. He is also the one who supplied the link to the M16 Connector from Ali Express. It's people like him that jump in here giving up their free time to out fellow reefers. And he is the reason I am making this post (just paying it forward in hopes that this post will help someonw else). And finally a shout out to my wife, who was basically my eyes and hands as these screws and jumpers are very, very small and difficult to make for an old guy
I was able to make everything and get it all ready, she put those tiny wires into the screw-down sockets while I held everthing in place as she screwed down the screws. You can see the screwdrivers we used in some of the photos. These are from an eyeglass repair kit my wife had (came in very handy). We had to use the smallest philips screwdriver in the kit.This DIY mod works for me. However, I take no responsibilty for anyone else attempting this mod if it were to damage their pump, Kraken, or anything else. I am currently running two Sicce SDC 7.0 pumps being powered by Kraken with this mod. Thses two pumps does make the Kraken PC Board Temp run slightly higher, turning the temp numbers Orange. Here is more info about that in this thread here at Hydros Forum: Kraken PC Board Temp Too High???
I am assured by Hydros that this is not a problem for the pumps or Kraken. Let me know if anyone has any questions, I am happy to try and help.
Ken S
70rsss
New member
Thank you Ken! Let me see if I got it correct through my thick skull? Kraken side pin 1 & 2 are grounds 3 & 4 are power. On the Sicce side of the plug, ground also goes to pin 1 & 2 and power 3 & 4? So Red wire connected to pin 1 is ground, Blue wire connected to pin 2 is ground and Black & White wires connected to pin 3 is power?? With nothing connected to pin 4.

It seems a couple people are confused so I thought I'd post this picture above. Basically, the wires coming out of the Sicce controller connector are exactly backwards from the Kraken pinout. You cannot just go pin 1 to pin 1, pin 2 to pin 2 and so on. You have to wire your connector as shown in the photo. Just follow the diagram and you should be fine, privided you connect/solder correctly and use the correct guage wire. It's not hard, it looks harder than it is. Dealing with all the small parts, wires, and screws was by far the hardest part for me.
Pin 4 on the Sicce side has nothing connected to it, as seen in the photo below. That is a photo of the Sicce connector taken apart to see how it is wired. I am not an electrician...at all. I hate working with electric. But I do know that for the most part, ground is usually not dangerous. I knew white and black are ground, and I knew red is hot. Basically, I just assumed (and hoped!) that blue was also hot. Since Pin 4 of the Sicce connector had nothing connected to it, I went ahead and did a jumper to it from the black/ground wire. Figured it couldn't hurt anything.
And that's all there was to it. Extremely minimal amount of electrical knowledge and a bit of guessing. But, mostly just common sense. Once I opened up the Sicce connector, then looked at the Kraken pinout, I knew the first cable I made was backwards! Good thing I didn't plug in that sucker!

70rsss
New member
Ok, here is the how-to guide to making a DIY cable so the Sicce SDC 7.0 pump can be powered with Kraken.
First, you'll need to buy these: Amazon.com
You'll only need the Female side. These are quality connectors with quality wire. Maybe you can find someone that sells only the Female? I couldn't find them, but I'm sure they are out there, I didn't spend a whole lot of time looking. The first ones I bought were advertised as 18AWG wire, but when I got them, they weren't. The wire was super tiny and thin and defintely not 18AWG, so be careful. From what I have read, the guage of the wire DOES matter.
Next, you'll need one of these for each DIY conector: https://www.aliexpress.us/item/3256...st_main.5.62991802F7ZB5I&gatewayAdapt=glo2usa
These screws are tiny. If you can solder and have the tools, you can get the solder type. I don't, so I went with the screws. I cannnot even see the screw tips they are so small, and if your screw them out too far, they can fall out, and trust me, they are so tiny, once one hits the floor, you will never find it
When you open the Sicce connector going into the controller, you will see:
Red wire connected to pin 1
Blue wire connected to pin 2
Black & White wires connected to pin 3
Nothing connected to pin 4
Below is the pinout for the Kraken.
View attachment 5078
Now it's time to make the connector.
Here is the wire before assembly. I used a heat shrink tube (probably not necessary). Put the tube on the wire, and then the TWO parts you see in the photo that screw onto the Sicce controller after you assemble everything. Here is a picture. And you'll need to make two small jumpers.
View attachment 5079
Next is a photo of the cable with the jumpers installed. You need to bend them to 180 degrees.
View attachment 5080
Here is a pic where you can see the RED wire is going to Pin 3 with a jumper to Pin 4.
View attachment 5081
Finally, here are two pics showing the completed cable. The black wire goes to Pin 1 with a jumper to Pin 2.
View attachment 5082View attachment 5083
I want to give a shout out to Richard (BR260354) for the help he gave me with this. He is also the one who supplied the link to the M16 Connector from Ali Express. It's people like him that jump in here giving up their free time to out fellow reefers. And he is the reason I am making this post (just paying it forward in hopes that this post will help someonw else). And finally a shout out to my wife, who was basically my eyes and hands as these screws and jumpers are very, very small and difficult to make for an old guy
This DIY mod works for me. However, I take no responsibilty for anyone else attempting this mod if it were to damage their pump, Kraken, or anything else. I am currently running two Sicce SDC 7.0 pumps being powered by Kraken with this mod. Thses two pumps does make the Kraken PC Board Temp run slightly higher, turning the temp numbers Orange. Here is more info about that in this thread here at Hydros Forum: Kraken PC Board Temp Too High???
I am assured by Hydros that this is not a problem for the pumps or Kraken. Let me know if anyone has any questions, I am happy to try and help.
Ken S
Just what I needed.....Thank you so much Ken!View attachment 5084
It seems a couple people are confused so I thought I'd post this picture above. Basically, the wires coming out of the Sicce controller connector are exactly backwards from the Kraken pinout. You cannot just go pin 1 to pin 1, pin 2 to pin 2 and so on. You have to wire your connector as shown in the photo. Just follow the diagram and you should be fine, privided you connect/solder correctly and use the correct guage wire. It's not hard, it looks harder than it is. Dealing with all the small parts, wires, and screws was by far the hardest part for me.
Pin 4 on the Sicce side has nothing connected to it, as seen in the photo below. That is a photo of the Sicce connector taken apart to see how it is wired. I am not an electrician...at all. I hate working with electric. But I do know that for the most part, ground is usually not dangerous. I knew white and black are ground, and I knew red is hot. Basically, I just assumed (and hoped!) that blue was also hot. Since Pin 4 of the Sicce connector had nothing connected to it, I went ahead and did a jumper to it from the black/ground wire. Figured it couldn't hurt anything.
And that's all there was to it. Extremely minimal amount of electrical knowledge and a bit of guessing. But, mostly just common sense. Once I opened up the Sicce connector, then looked at the Kraken pinout, I knew the first cable I made was backwards! Good thing I didn't plug in that sucker!
View attachment 5085
I woke this morning to Hydros notifications on my phone that my sump level is high. I go down to the tank, both Sicce pumps are off.
They were actually cycling on/off, on/off, on/off. Kraken was killing power to them when they tried to start up. It is weird, it ran both pumps with no issues (except the orange pc board temp, which Hydros told me is not an issue) for the last 48 hrs+. I guess Kraken just cannot handle the power draw from two of these big pumps running constant, which is disappointing as each pump is set to only 62%. I put one back on a brick & will test running only one for a while to see how it goes. I'm pretty sure one will be fine, we'll see. I will definitely be putting both on bricks when I leave for vacation just to be safe. If it starts killing power to a single pump, then maybe I would expect something is wrong with the DIY connector?? I don't know.
Seems Kraken is more made for smaller tanks with less/smaller equipment in mind. I wonder if I were to move to Varios 4's if I'd run into the same issue. I guess it is a possibility since both are listed as 24V pumps, but I assume the Sicce draws much more power as the max GPH of the Sicce is nearly double of the Varios 4.
OK, bad news. I would not use this mod. Something is wrong.
I had an alert my sump level was too high & I came down to see the single pump connected to Kraken was off & doing the endless loop of trying to start up, shut down, try to start, shut down, over & over in an endless loop. The one on the brick was working fine.
I am now stumped. It worked for 2 days, then boom. Now, neither will work with Kraken. I just can't understand why Kraken cannot power a single SDC 7.0. It is a 24V pump. It keeps shutting it off when it's trying to start up. I need to know why Kraken is shutting it down, or maybe it's the pump shutting itself down due to something with the DIY connector. Who knows? If anyone has any input, I'm all ears.
Does anyone know if Hydros keeps a log that I can access that would show why Kraken is shutting power to these pumps? Like maybe a ground fault, or something??